2018년 12월 27일 목요일

그룹핑 엑셀 UI 만들기


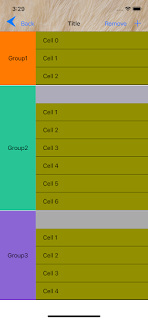
UITableView 또는 UICollectionView를 이용해서 위의 화면과같은 UI를 구현하기란 쉽지않다.
그래서 UIStackView를 사용해서 구현하면 좀 더 쉽게 구현할 수 있다.

UIScrollView에 UIStackView를 컨텐츠뷰의 서브뷰로 추가한다.
첫번째 그룹의 row UIStackView에 ArrangedSubView를 추가하지 않고 대신에 Intrinsic Size를 설정한다. 그 이유는 처음에 기본적으로 보여지는 row 없이 소스코드에서 추가하는 기능을 구현해보기 위해서다.

UIScrollView의 컨텐츠뷰의 centr Y를 뺀다.


마지막으로, 동적으로 추가할 셀을 만든다. 
StackCell.swift, StackCells.xib 두개의 파일을 생성한다.


소스코드는 다음과 같이 구현한다 :

GitHub


class Sub2ViewController: UIViewController {
    @IBOutlet var cellStackView1: UIStackView! //Group1
    @IBOutlet var cellStackView2: UIStackView! //Group2
    @IBOutlet var cellStackView3: UIStackView! //Group3
    
    override func viewDidLoad() {
        super.viewDidLoad()
        
        // 첫번째 그룹에 row 추가
        addCell(to: cellStackView1)
        addCell(to: cellStackView1)
        addCell(to: cellStackView1)
        addCell(to: cellStackView1)
        
        // 두번째 그룹에 row 추가
        addCell(to: cellStackView2)
        addCell(to: cellStackView2)
        addCell(to: cellStackView2)
        addCell(to: cellStackView2)
        addCell(to: cellStackView2)
        addCell(to: cellStackView2)
        addCell(to: cellStackView2)
        
        // 세번째 그룹에 row 추가
        addCell(to: cellStackView3)
        addCell(to: cellStackView3)
        addCell(to: cellStackView3)
        addCell(to: cellStackView3)
        addCell(to: cellStackView3)
        addCell(to: cellStackView3)
    }
    
    @IBAction func actionRemove(_ sender: Any) {
        removeCell(to: cellStackView1)
    }
    
    @IBAction func actionAdd(_ sender: Any) {
        addCell(to: cellStackView1)
    }


    func addCell(to stackView: UIStackView) {
        let cell = Bundle.main.loadNibNamed("StackCells", owner: self, options: nil)![0] as! StackCell
        cell.heightAnchor.constraint(equalToConstant: 50).isActive = true
        cell.label.text = "Cell \(stackView.arrangedSubviews.count)"
        stackView.addArrangedSubview(cell)
        
    }
    
    func removeCell(to stackView: UIStackView) {
        let cell = stackView.arrangedSubviews.first!
        stackView.removeArrangedSubview(cell)
        cell.removeFromSuperview()
    }

}


class StackCell: UIView {
    @IBOutlet var label: UILabel!


}


UIScrollView의 컨텐츠에 UITableView를 사용하기


<UIScrollView의 컨텐츠에 UITableView를 사용하여 UITableView의 컨텐츠 사이즈만큼 스크롤링하기>

UIScrollView에 UITableView를 서브뷰로 추가하고, UITableView의 컨텐츠 사이즈만큼 UIScrollView를 스크롤링하는게 목표이다. 이때 UITableView는 스크롤링되지 않는다.

1. 레이아웃 구성


높이는 지정하지 않는다.


테이블뷰의 높이를 추가한후에 Outlet변수를 추가한다.

@IBOutlet var tableViewHeight: NSLayoutConstraint!


UITableView의 스크롤링기능을 모두 끈다.


마지막으로, 테이블뷰의 높이를 테이블뷰의 컨텐츠사이즈로 한다.

override func viewDidLoad() {
        super.viewDidLoad()
        

        DispatchQueue.main.async {
            self.tableViewHeight.constant = self.tableView.contentSize.height
        }
    }


----------

전체소스:

class Sub1ViewController: UIViewController {

    @IBOutlet var tableView: UITableView!
    @IBOutlet var tableViewHeight: NSLayoutConstraint!
    
    override func viewDidLoad() {
        super.viewDidLoad()
        

        DispatchQueue.main.async {
            self.tableViewHeight.constant = self.tableView.contentSize.height
        }
    }

}

extension Sub1ViewController: UITableViewDataSource {
    
    func tableView(_ tableView: UITableView, numberOfRowsInSection section: Int) -> Int {
        return 30
    }
    
    func tableView(_ tableView: UITableView, cellForRowAt indexPath: IndexPath) -> UITableViewCell {
        let cell = tableView.dequeueReusableCell(withIdentifier: "MyCell", for: indexPath) as! MyCell
        cell.label.text = "Label \(indexPath.row+1)"
        cell.frame = CGRect(x: 0, y: 0, width: self.view.frame.size.width, height: 50)
        return cell
    }
    
}


2018년 12월 19일 수요일

Create a Horizontal Paging UIScrollView with UIStackView

앱의 사용가이등의 화면을 통일되지않은 형태의 여러페이지로 보여주고자할때 UICollectionView보다는 UIStackView를 통해서Layout을 구성하면 보다 쉽게 원하는 UI를 구현할 수 있다.


STEP1.

IB에서 UIViewController의 Size를 1875*667로 설정한다. (iPhone8 Width * 5개페이지  = 1875)


STEP2.

IB에서 UIViewController에 UIScrollView 추가한다.

STEP3.

IB에서 UIScrollView에 UIStackView 추가. 다음과 같이 프라퍼티 설정 :
Axis = Horizontal
Distribution = Fill Equally
Spacing = 0

Constraints 설정 :
Trailing Space = Leading Space = Bottom Space = Top Space = 0
Align Center Y to Superview


STEP4.

UIView 5개를 UIStackView에 추가.
첫번째  UIView의 Width = 375로 설정, 나머지 UIView들의 Width를 첫번재 UIView의 Width와 같게 설정한다.


구조는 다음과 같이 보인다:


STEP5.

첫번째  UIView의 Width를 NSLayoutConstraint 멤버변수로 연결. 나중에 UIViewController:ViewDidLoad 함수에서 view의 Width로 설정. 이렇게 하는 이유는 UIView의 Width가 단말기의 Width와 안맞는 문제가 존재하기 때문에, 실제 단말기의 Width로 설정해 주기 위해서다.

override func viewDidLoad() {
        super.viewDidLoad()

        firstViewWidth.constant = self.view.frame.size.width


2018년 12월 3일 월요일

#pragma in Swift

// TODO : "to-do item"
// FIXME : "bug fix reminder"
// MARK : "comment"


- 추가하면 세퍼레이터로 나뉘어진다.

// TODO : - "to-do item"
// FIXME : - "bug fix reminder"
// MARK : - "comment"


2018년 11월 25일 일요일

재사용가능한 그룹뷰 만들기


PassGroupView.xib 생성하고 레이아웃 구성


PassGroupView.swift 생성

class PassGroupView: UIView {
    
    var height: CGFloat? {
        didSet {
            UIView.animate(withDuration: 0.2) {
                self.invalidateIntrinsicContentSize()
            }
        }
    }
    
    required init?(coder aDecoder: NSCoder) {
        super.init(coder: aDecoder)
        self.xibSetup()
    }
    
    public override var intrinsicContentSize: CGSize {
        if let height = height {
            return CGSize(width: frame.width, height: height)
        } else {
            return CGSize(width: frame.width, height: frame.height)
        }
    }
    
    private func xibSetup(){
        guard let xibName = NSStringFromClass(self.classForCoder).components(separatedBy: ".").last else { return }
        let view = Bundle.main.loadNibNamed(xibName, owner: self, options: nil)?.first as! UIView
        view.frame = self.bounds
        self.addSubview(view)
    }


}


PassGroupView.xib 에서 File's Owner를 PassGroupView로 지정


PassGroupView를 사용하고싶은 ViewController에 배치.


PassGroupView의 높이를 지정하지않고 Placeholder로 설정함.


뷰컨트롤러에서 PassGroupView의 intrinsicContentSize 수정.

class ViewController: UIViewController {

    @IBOutlet weak var passGroupView: PassGroupView!
    
    
    override func viewDidLoad() {
        super.viewDidLoad()
        
    }

    @IBAction func actionFold(_ sender: Any) {
        passGroupView.height = 41
    }
    
    @IBAction func actionUnfold(_ sender: Any) {
        passGroupView.height = 82
    }

}


실행결과 :


https://medium.com/zenchef-tech-and-product/how-to-visualize-reusable-xibs-in-storyboards-using-ibdesignable-c0488c7f525d


서브뷰들을 비율대로 배치하는 방법

1. UIView 안에서


서브뷰의 넓이를 부모뷰의 넓이로 지정하고 multiplier로 비율을 조정한면된다.


2. UIStackView 안에서


2018년 11월 22일 목요일

ScrollView의 컨텐츠에따라 동적으로 늘어나면서, 불필요할때는 안보이도록


<조건>
1.  스크롤뷰 안의 컨텐츠는 [답변영역]과 [문의영역]으로 나뉘어져있고, 각각의 영역은 Label 사이즈에 따라 자동으로 늘어난다.  
2. 답변이없는 경우에는 [답변영역]이 사라지고, [문의영역]이 위로 올라간다


<솔루션>
1. 스크롤뷰에서 컨텐츠의 높이에 따라 컨테이너뷰들이 자동으로 늘어날 수 있도록 Constraints를 지정한다.


2. Source 코드에서 [답변영역]의 height constraint를 0으로하여 constraint를 추가한다.

override func viewDidLoad() {
        super.viewDidLoad()

        ...
        
        if questionItem?.status != "완료" {
            answerContainerView.heightAnchor.constraint(equalToConstant: 0).isActive = true
        }
    }


2018년 11월 18일 일요일

Two UIViews 사이, 및 앞, 뒤의 공백을 화면사이즈를 따라 Flexible하게 (두 뷰는 고정된사이즈) 하는 방법


두 뷰 사이의 공간 및  leading, tailing 공간이 화면사이즈에따라 늘어나고, 두 뷰는 고정된 사이즈를 유지하는 방법  :

<- flexible -> [view] <- flexible -> [view] <- flexible ->


1.  IB에서 레이아웃만 잡아주는것으로도 가능 함.


여기에서 핵심은  space 역활을 하는 뷰들을 같은 사이즈로 한다는것임.


2018년 11월 7일 수요일

Rounded Corner View

// define

extension UIView {
    func roundCorners(corners:UIRectCorner, radius: CGFloat) {
        DispatchQueue.main.async {
            let path = UIBezierPath(roundedRect: self.bounds, byRoundingCorners: corners, cornerRadii: CGSize(width: radius, height: radius))
            let mask = CAShapeLayer()
            mask.path = path.cgPath
            self.layer.mask = mask
        }

    }
}


// using


bubbleView.roundCorners(corners: [.topLeft, .bottomRight, .topRight], radius: 21)


https://www.appcoda.com/bezier-paths-introduction/

2018년 10월 30일 화요일

xcode 버젼 스위칭


현재 xcode 버젼 보기

xcode-select --print-path


스위칭하기

sudo xcode-select --switch /Applications/Xcode9.app/Contents/Developer

2018년 10월 23일 화요일

Fork 을 Original repo 와 동기화 방법

명령어 :

git pull UrlOfOriginalRepo YourCloneRepo


example)

AD01224046:~ user$ git pull https://git-dev.linecorp.com/buffett/client-ios.git develop


2018년 10월 8일 월요일

클래스이름 가져오기


let typeFromClass = String(describing: MyView.self)
        let myView = UINib(nibName: typeFromClass, bundle: nil).instantiate(withOwner: nil, options: nil)[0] as! UIView
        let typeFromInstance = String(describing: type(of: myView))
        
        print(typeFromClass) // "MyView"

        print(typeFromInstance) // "MyView"


MyView
MyView

생성자에 파라미터 전송하기


2. instantiate from class with parameters

//  MyView

class MyView: UIView {

    var color: UIColor
    
    required init(frame: CGRect, color: UIColor) {
        self.color = color
        super.init(frame: frame)
        
        // do anything after instantiated
        self.backgroundColor = self.color
    }
    
    required init?(coder aDecoder: NSCoder) { // never called
        fatalError("init(coder:) has not been implemented")
    }
    

}


//  ViewController.swift

override func viewDidLoad() {
        ...
        let myView = MyView(frame: CGRect(x: 0, y: 0, width: 100, height: 200), color: UIColor.cyan)
        ...
    }

2018년 8월 29일 수요일

파이 차트 (애니메이션 포함)


class CircularProgressView: UIView {
    
    enum Style {
        case donut
        case circle
    }
    
    private let kMaxProgress: Float = 1.0
    private var style = Style.donut
    private var trackTintColor: UIColor = UIColor.gray
    private var progressTintColor: UIColor = UIColor.orange
    private var lineWidth: Float = 0.0
    private var progress: Float = 0.0
    private var animation: Bool = false
    
    func drawDonutChart(progress: Float, lineWidth: Float = 5.0, trackColor: UIColor = UIColor.rgb(233, 239, 241), progressColor: UIColor = UIColor.rgb(5, 200, 123)) {
        self.style = .donut
        self.progress = progress
        self.lineWidth = lineWidth
        self.trackTintColor = trackColor
        self.progressTintColor = progressColor
        setNeedsDisplay()
    }
    
    func drawDonutChartWithAnimation(progress: Float, lineWidth: Float = 5.0, progressColor: UIColor = UIColor.rgb(5, 200, 123)) {
        self.animation = true
        self.layer.sublayers = nil
        let layer = CAShapeLayer()
        layer.frame = self.bounds
        layer.strokeColor = progressColor.cgColor
        layer.fillColor = UIColor.clear.cgColor
        layer.lineWidth = CGFloat(lineWidth)
        layer.path = bezierCgPath(progress: progress)
        layer.strokeEnd = 1
        
        let animation = CABasicAnimation(keyPath: "strokeEnd")
        animation.duration = 0.5
        animation.fromValue = 0.0
        animation.toValue = 1.0
        animation.timingFunction = CAMediaTimingFunction(name: kCAMediaTimingFunctionLinear)
        layer.add(animation, forKey: nil)
        
        self.layer.addSublayer(layer)
    }
    
    func drawPieChart(color: UIColor = UIColor.rgb(233, 239, 241)) {
        self.lineWidth = 0
        self.style = .circle
        self.trackTintColor = color
        setNeedsDisplay()
    }
    
    private func drawDonutProgress(progress: Float, center: CGPoint, radius: CGFloat, context: CGContext) {
        UIGraphicsPushContext(context)
        context.beginPath()
        let startAngle = -Float.pi / 2.0
        let endAngle = startAngle + (progress * 2.0 * Float.pi)
        context.addArc(center: center, radius: radius, startAngle: CGFloat(startAngle), endAngle: CGFloat(endAngle), clockwise: false)
        context.strokePath()
        UIGraphicsPopContext()
    }
    
    private func drawPieProgress(progress: Float, center: CGPoint, radius: CGFloat, context: CGContext) {
        UIGraphicsPushContext(context)
        context.beginPath()
        let startAngle = -Float.pi / 2.0
        let endAngle = startAngle + (progress * 2.0 * Float.pi)
        context.move(to: center)
        context.addArc(center: center, radius: radius, startAngle: CGFloat(startAngle), endAngle: CGFloat(endAngle), clockwise: false)
        context.closePath()
        context.fillPath()
        UIGraphicsPopContext()
    }
    
    private func bezierCgPath(progress: Float) -> CGPath {
        let bezierPath = UIBezierPath()
        bezierPath.addArc(withCenter: CGPoint(x: layer.frame.size.width / 2.0, y: layer.frame.size.height / 2.0),
                          radius: layer.frame.size.width / 2.0,
                          startAngle: CGFloat(-Float.pi / 2.0),
                          endAngle: CGFloat(-Float.pi / 2.0 + (progress * 2.0 * Float.pi)),
                          clockwise: true)
        return bezierPath.cgPath
    }
    
    override func draw(_ rect: CGRect) {
        if animation {
            return
        }
        var middlePoint = CGPoint()
        middlePoint.x = self.bounds.origin.x + self.bounds.size.width / 2.0
        middlePoint.y = self.bounds.origin.y + self.bounds.size.height / 2.0
        
        var radius = min(self.bounds.size.width / 2.0, self.bounds.size.height / 2.0)
        radius -= (CGFloat(lineWidth) / 2.0)
        
        let context = UIGraphicsGetCurrentContext()
        context?.saveGState()
        context?.setLineWidth(CGFloat(lineWidth))
        
        if let context = context {
            switch style {
            case .donut:
                trackTintColor.setStroke()
                drawDonutProgress(progress: kMaxProgress, center: middlePoint, radius: radius, context: context)
                progressTintColor.setStroke()
                drawDonutProgress(progress: progress, center: middlePoint, radius: radius, context: context)
            case .circle:
                trackTintColor.setFill()
                drawPieProgress(progress: kMaxProgress, center: middlePoint, radius: radius, context: context)
            }
        }
        
        context?.restoreGState()
    }


}